5. Git Without the Mystery
This chapter teaches you to inspect a meaningful change and save it as a commit. Begin with a working Chapter 4 toolchain and the CP01 source bundle supplied without learner Git history. Work in a new practice folder. By the end you will have two explanatory commits and will be able to say exactly which contents each saved.
An assistant can make a useful edit quickly. The next problem is knowing what changed and deciding whether to keep it. A copied folder named final-really-final does not make that decision clear. Git records selected versions and helps you compare them. We will use a small reporting-label change so the mechanics stay visible while the program remains understandable.
1. Local Git, hosting, and synchronization
Git is version-control software. A local repository contains recorded history and metadata alongside a working copy of project files. GitHub is a hosting and collaboration service that can store a remote copy of that history. You can inspect changes and make local commits without pushing anything to GitHub. Chapter 6 adds the remote step.
Cloud file synchronization serves a different purpose. A synchronizer may copy whichever files currently exist; it does not necessarily give you a reviewed, intentional sequence of project changes. Git also does not automatically preserve every untracked file or unsaved editor buffer. It records what you deliberately include in commits. Use it with ordinary backup practices rather than treating either as a complete replacement for the other.
A repository is not a magic “correct” folder. You can commit a broken program, a misleading README, or a secret. Git will faithfully preserve that choice. Our workflow puts inspection and relevant checks before the commit, so history records decisions you can explain. An intentionally failing exercise may be committed too, provided its message and documentation identify it as a seeded fault.
2. Understand the three places
The working tree is the project content you edit. The staging area, also called the index, is the content selected for the next commit. A commit records that selected snapshot with metadata and a relationship to earlier history. Staging a file selects its contents at that moment; later edits can remain unstaged. Pro Git, recording changes
Figure D05 shows these three places and the operations between them. Saving in the editor changes the working tree. Staging selects content for the next commit. Committing records the staged snapshot. Pushing, which comes later, transfers commits to a remote. Do not call all four actions “saving,” because each answers a different question.
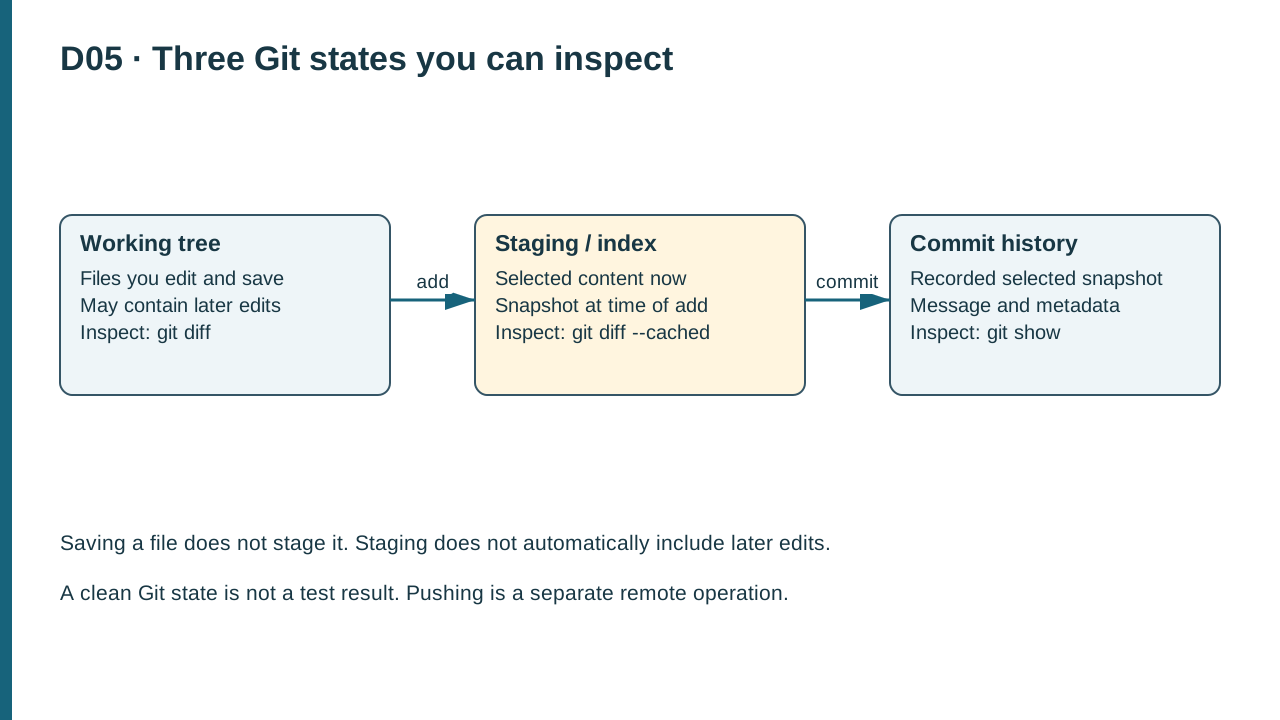
D05. Saving changes the working tree; add selects contents in staging; commit records that selected snapshot. Ordinary and cached diffs compare different states.
Consider a README with a corrected heading. You stage it, then add a troubleshooting paragraph. The staged snapshot has the heading correction, while the working file has both edits. A commit at that point saves the staged version. This is useful when intentional and confusing when accidental. Two diff views will make the distinction visible.
3. Initialize the practice repository
Extract the CP01 source bundle into a new sensor-monitor-git folder, separate from the unchanged starter. The bundle for this exercise must not already contain a .git directory. Open it in VS Code and confirm its README and source tree. Do not run initialization in your home folder, Downloads folder, or the parent of unrelated projects.
In PowerShell, from the extracted practice root:
# Context: PowerShell in the new sensor-monitor-git source-only folder.
Get-Location
git init -b main
git status
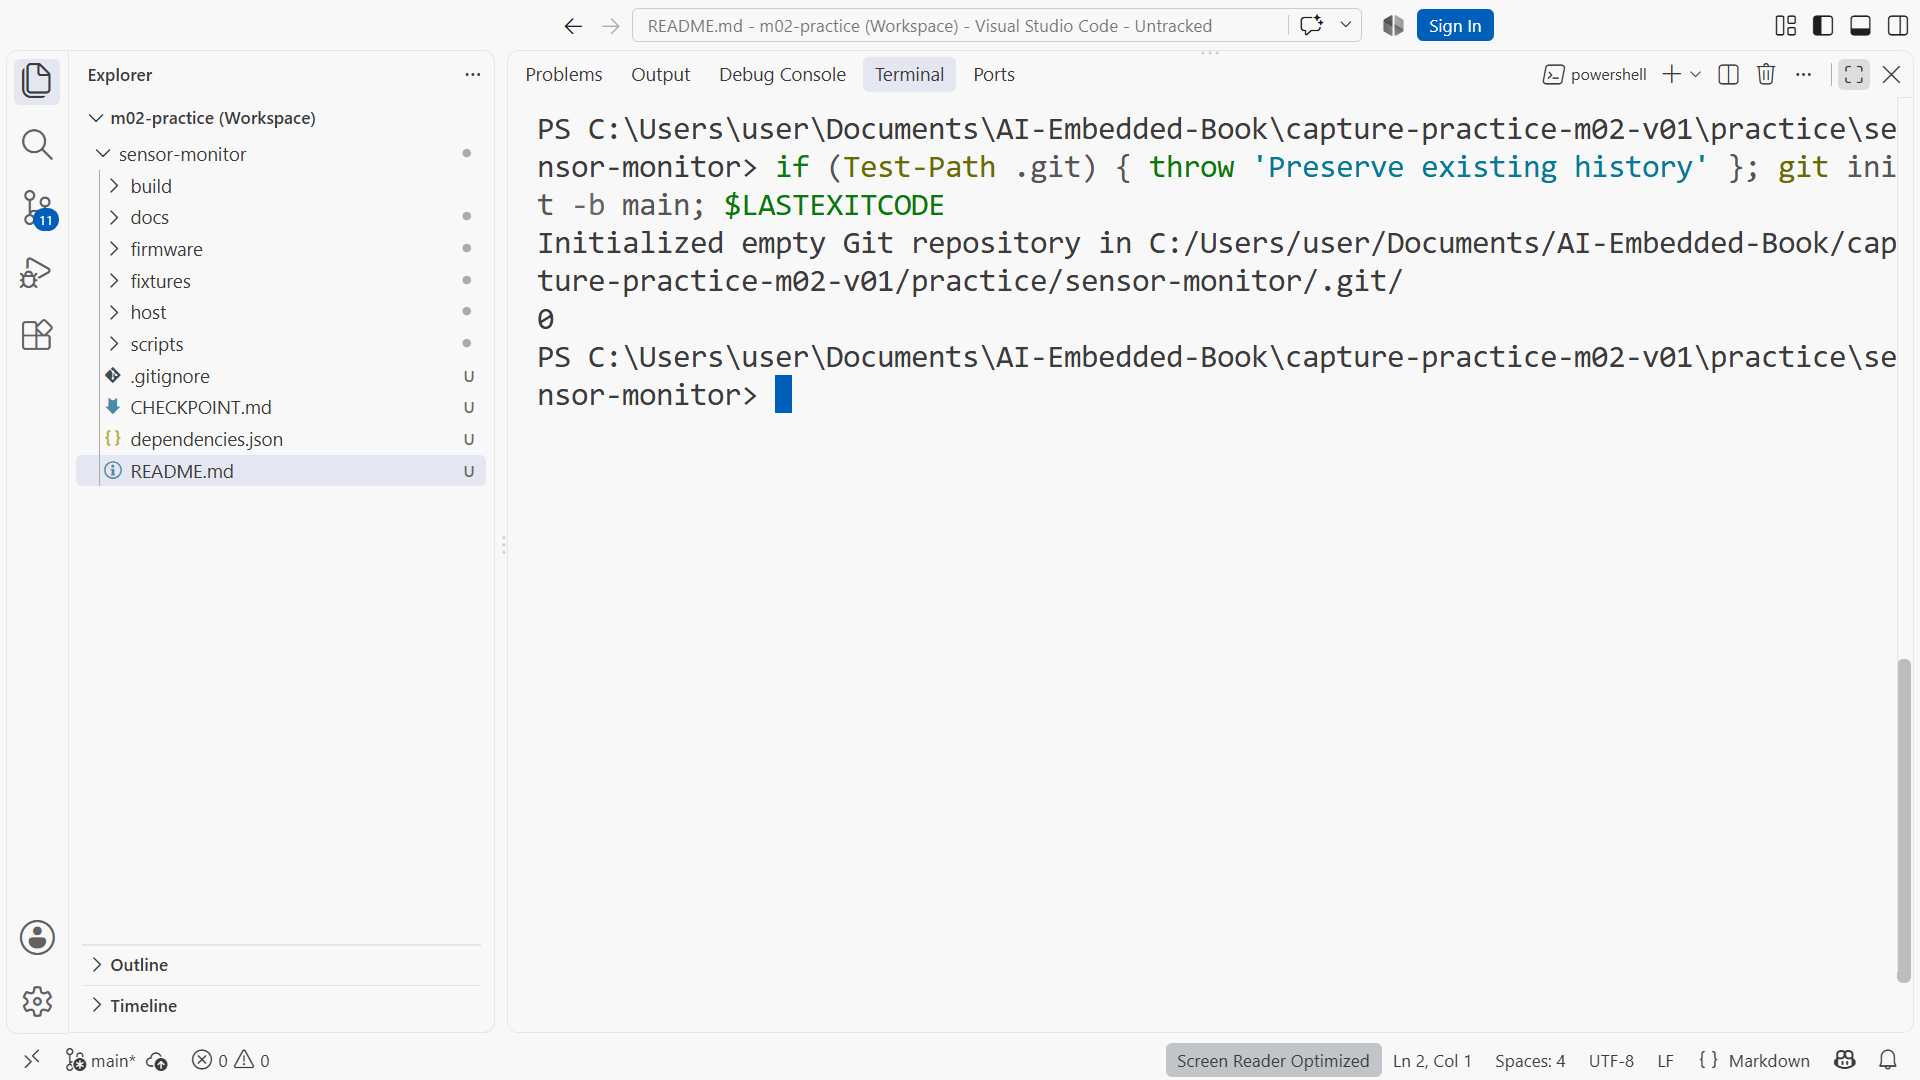
git init -b main creates repository metadata and names the initial branch main. It does not upload files or create a commit. The expected status lists untracked project files and indicates that no commit exists yet. Exact wording varies with Git version. If Git reports an existing repository, inspect the folder before proceeding; you may have opened the wrong extraction. git init reference
Set repository-local identity before the first commit. Use your chosen author name and, if you want GitHub attribution without exposing your private address, the exact no-reply address shown in your GitHub email settings. Do not invent an account-specific address from this example:
# Context: PowerShell in this practice repository; replace both example values.
git config user.name 'Your chosen author name'
git config user.email 'YOUR-VERIFIED-NOREPLY-ADDRESS'
git config --get user.name
git config --get user.email
These are local settings because --global is omitted. Commit identity is metadata; it is not GitHub authentication. The host's email privacy settings explain how its no-reply address works. Check your actual setting before saving it. GitHub commit email
4. Decide what belongs in history
Source code, reproducible scripts, requirements, tests, and useful documentation belong in this practice repository. Generated compiler output can usually be recreated and should be excluded. The supplied .gitignore defines relevant exclusions such as the project's build directory. Read it rather than replace it with a long list copied from an unrelated stack.
A .gitignore entry prevents matching untracked files from appearing as ordinary candidates for addition. It does not remove a file already tracked in history. It also does not encrypt a credential or make an uploaded secret private. This chapter's deliberate mistake uses harmless generated output after a baseline commit; do not practice with sensitive files. gitignore reference
Run git status and inspect the list. If you see a personal document, credential file, or an entire unrelated directory, stop and correct the project boundary. If you see expected firmware, host code, scripts, and documentation, stage those named paths. The source bundle may contain additional tracked support files; use its README and release tree to account for them.
# Context: PowerShell in the CP01 practice repository.
git add README.md .gitignore dependencies.json firmware host scripts fixtures docs CHECKPOINT.md
git status
git diff --cached --stat
git diff --cached
Add any other intended source-bundle documents explicitly after reviewing them. Do not use a broad command merely to silence untracked status. In VS Code, the Source Control view shows changed files; its stage control selects them, and the Staged Changes group corresponds to the staging area. Read the diff in either interface before committing.
5. Commit the baseline
Run the documented baseline check from the practice folder. Save the result in your learner notebook outside generated build output, or in a deliberate evidence file if the exercise calls for it. Then make the baseline commit:
# Context: PowerShell in the CP01 practice repository after baseline review.
git commit -m 'Record sensor monitor baseline and build instructions'
git log --oneline -2
git status
A commit records the staged content, along with its message and metadata. A useful message explains the purpose of the change. “Update” and “AI changes” do little to help your future self choose a recovery point. A commit's identifier is computed from its contents and metadata, so your identifier will differ from a screenshot's even when the teaching steps are equivalent. git commit reference
Expected observations are one baseline entry in history and no unintended changes left in the working tree. A clean status does not mean the code is correct; it means the relevant tracked states agree and there are no listed untracked candidates. Keep the test result separate from the Git-state observation.
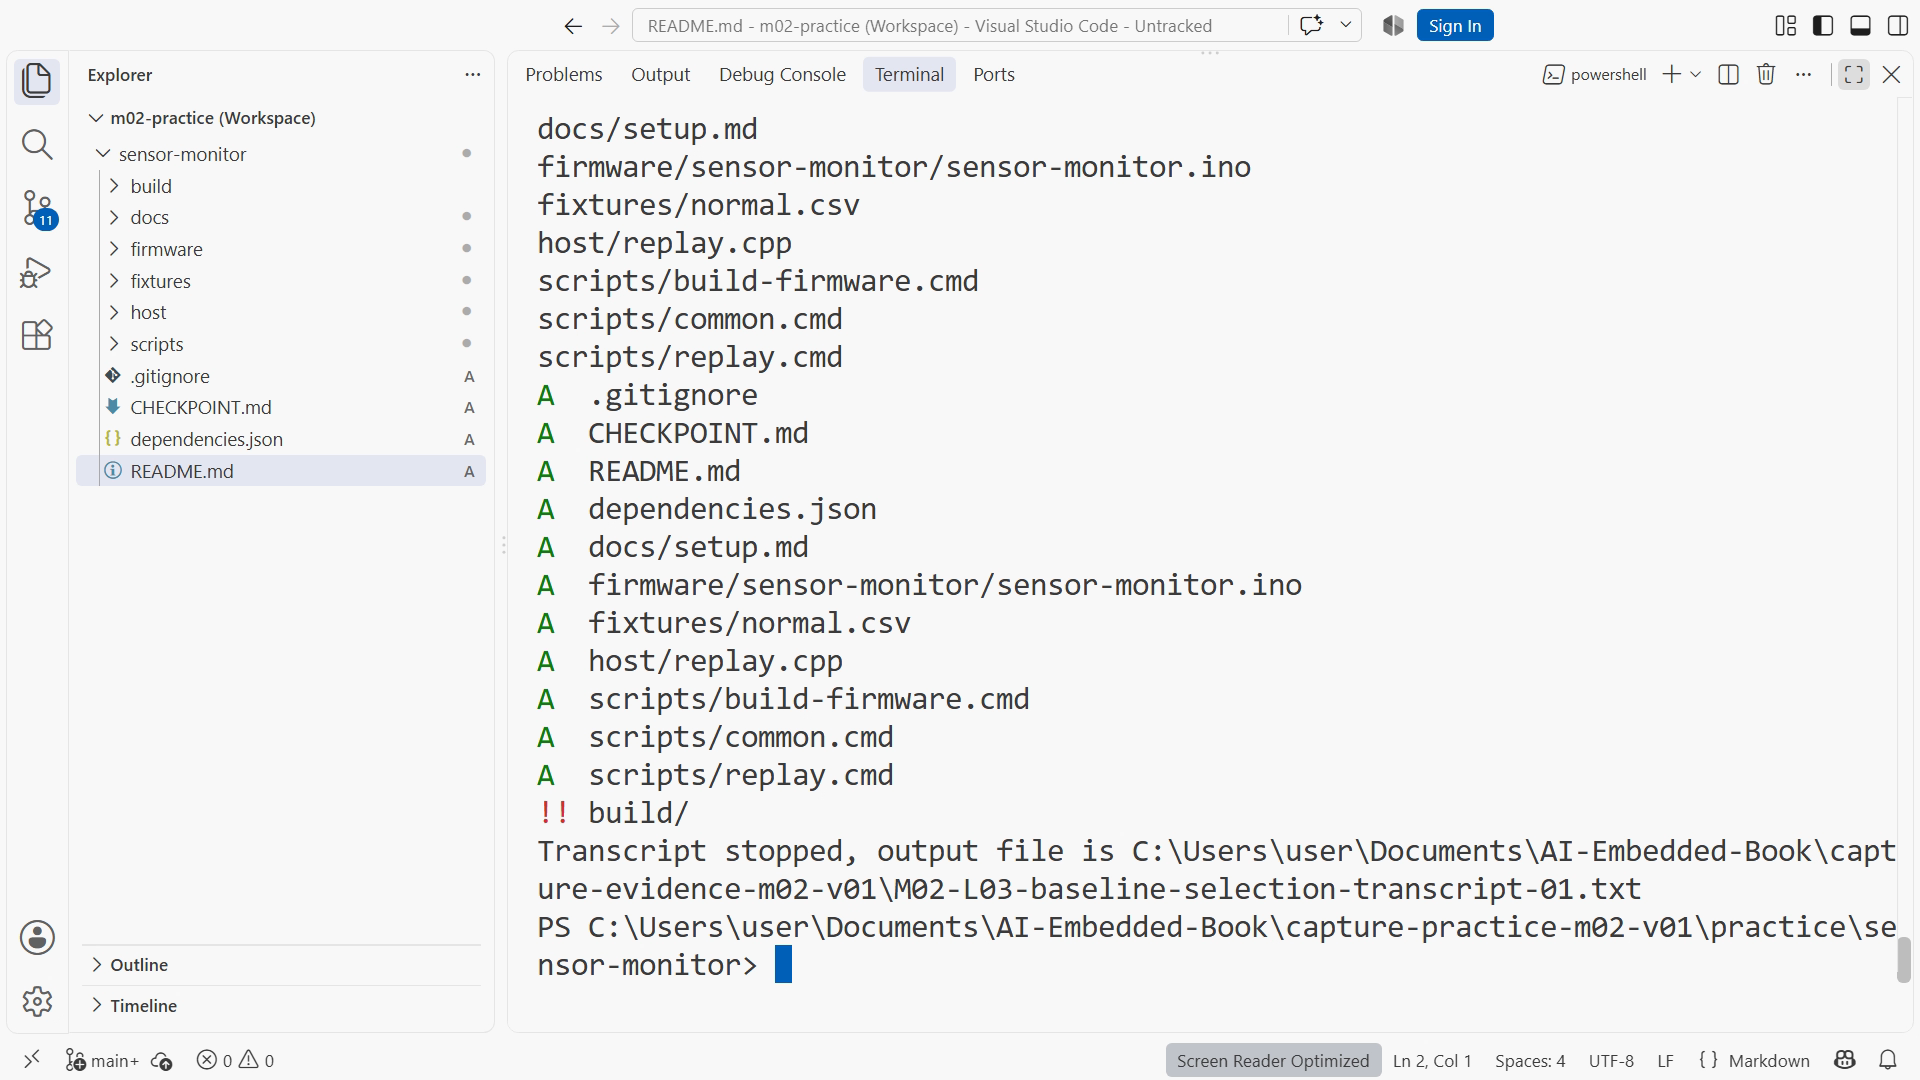
Figures SS05-01 and SS05-02 show initialization and the reviewed file selection. They should show the actual practice path and expected exclusions, not another repository whose contents happen to look similar. Your own outputs are valid even when line counts and commit IDs differ.
6. Worked example: read a report-label diff
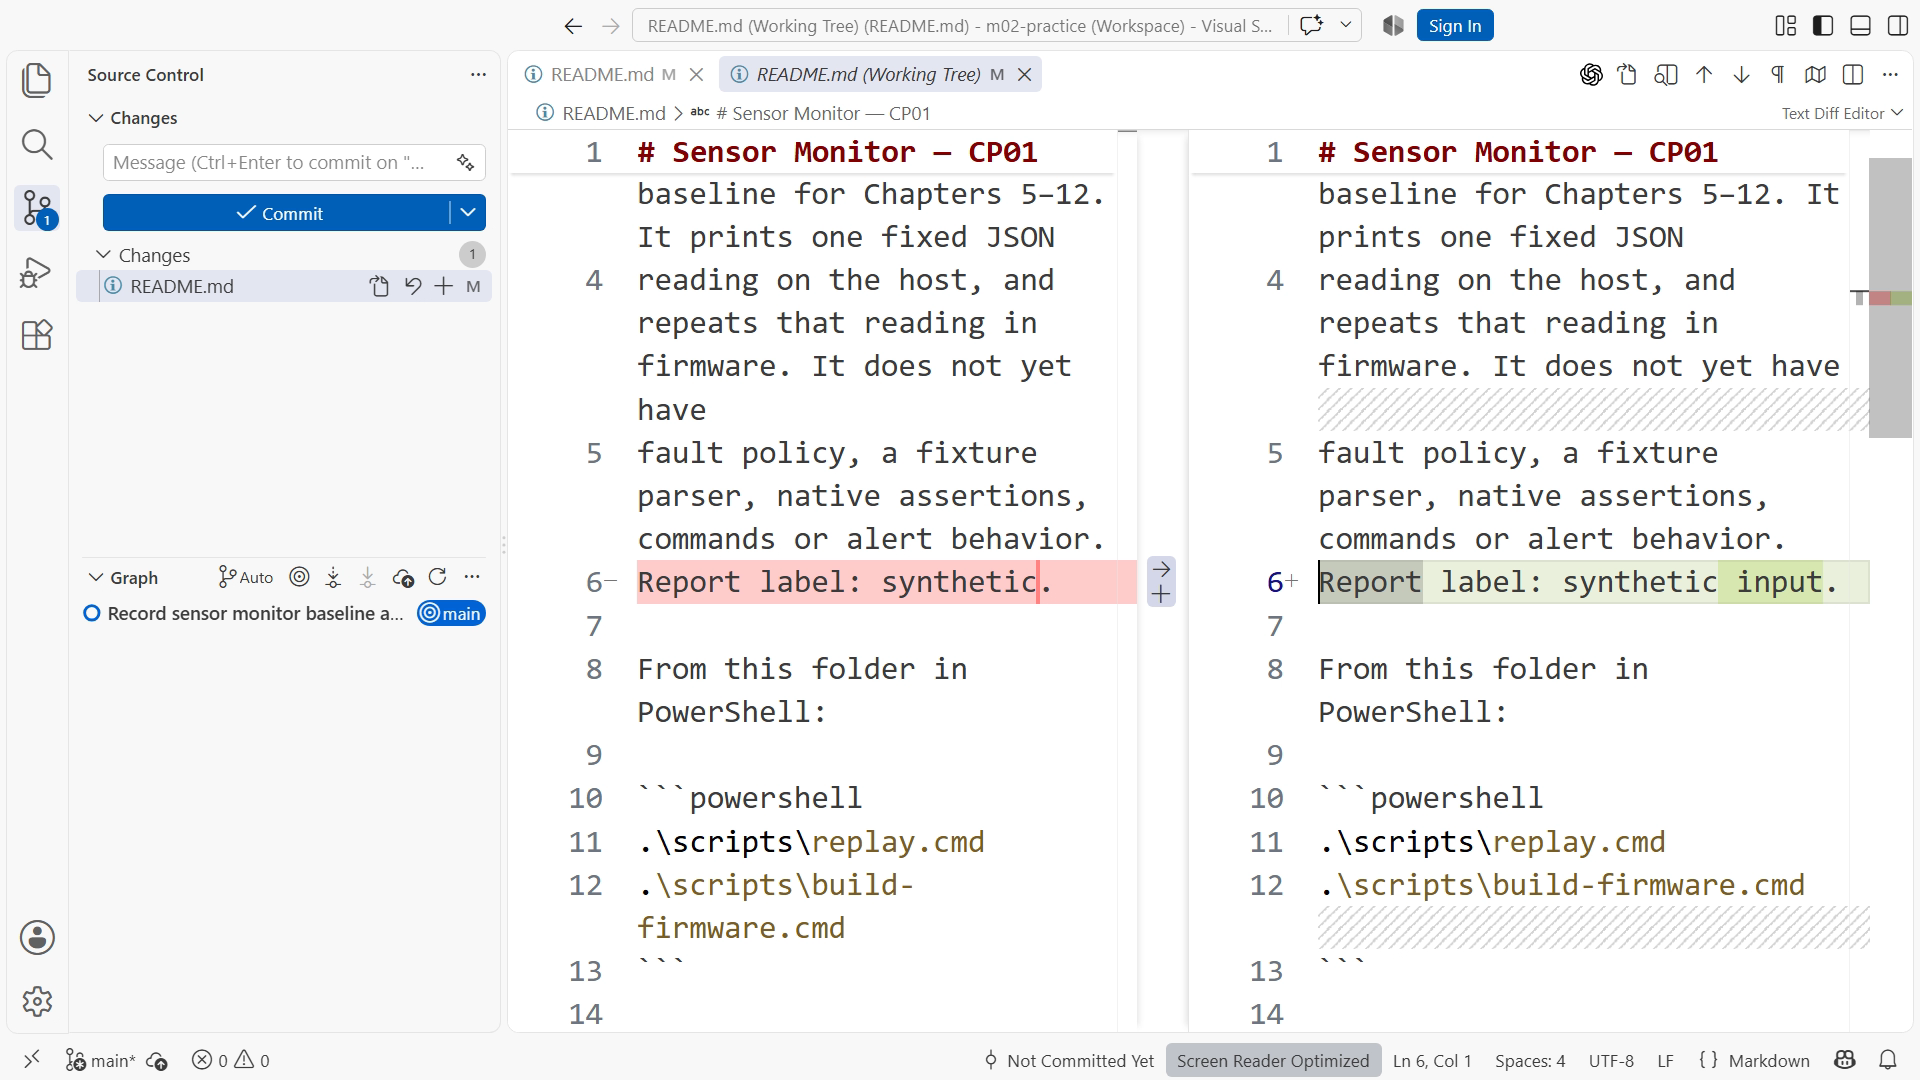
Find the exact line Report label: synthetic. in the CP01 README. Change it to Report label: synthetic input. and save. This is a human-facing documentation label, not a machine-readable key or firmware edit. The exact path is README.md; the baseline's fixed host sample remains 25.00.
The expected diff for that edit is:
-Report label: synthetic.
+Report label: synthetic input.
This display is the expected comparison, not a captured command result. Inspect your actual diff to establish what changed.
The minus line is the previous content; the plus line is the new content. These markers belong to the diff display and are not characters to paste into the README. Context lines help locate the change. The file header identifies which file changed. A whole file appearing replaced can indicate formatting or line-ending changes that deserve inspection before acceptance. git diff reference
Run the two comparisons:
# Context: PowerShell in the practice repository after saving the edit.
git diff
git diff --cached
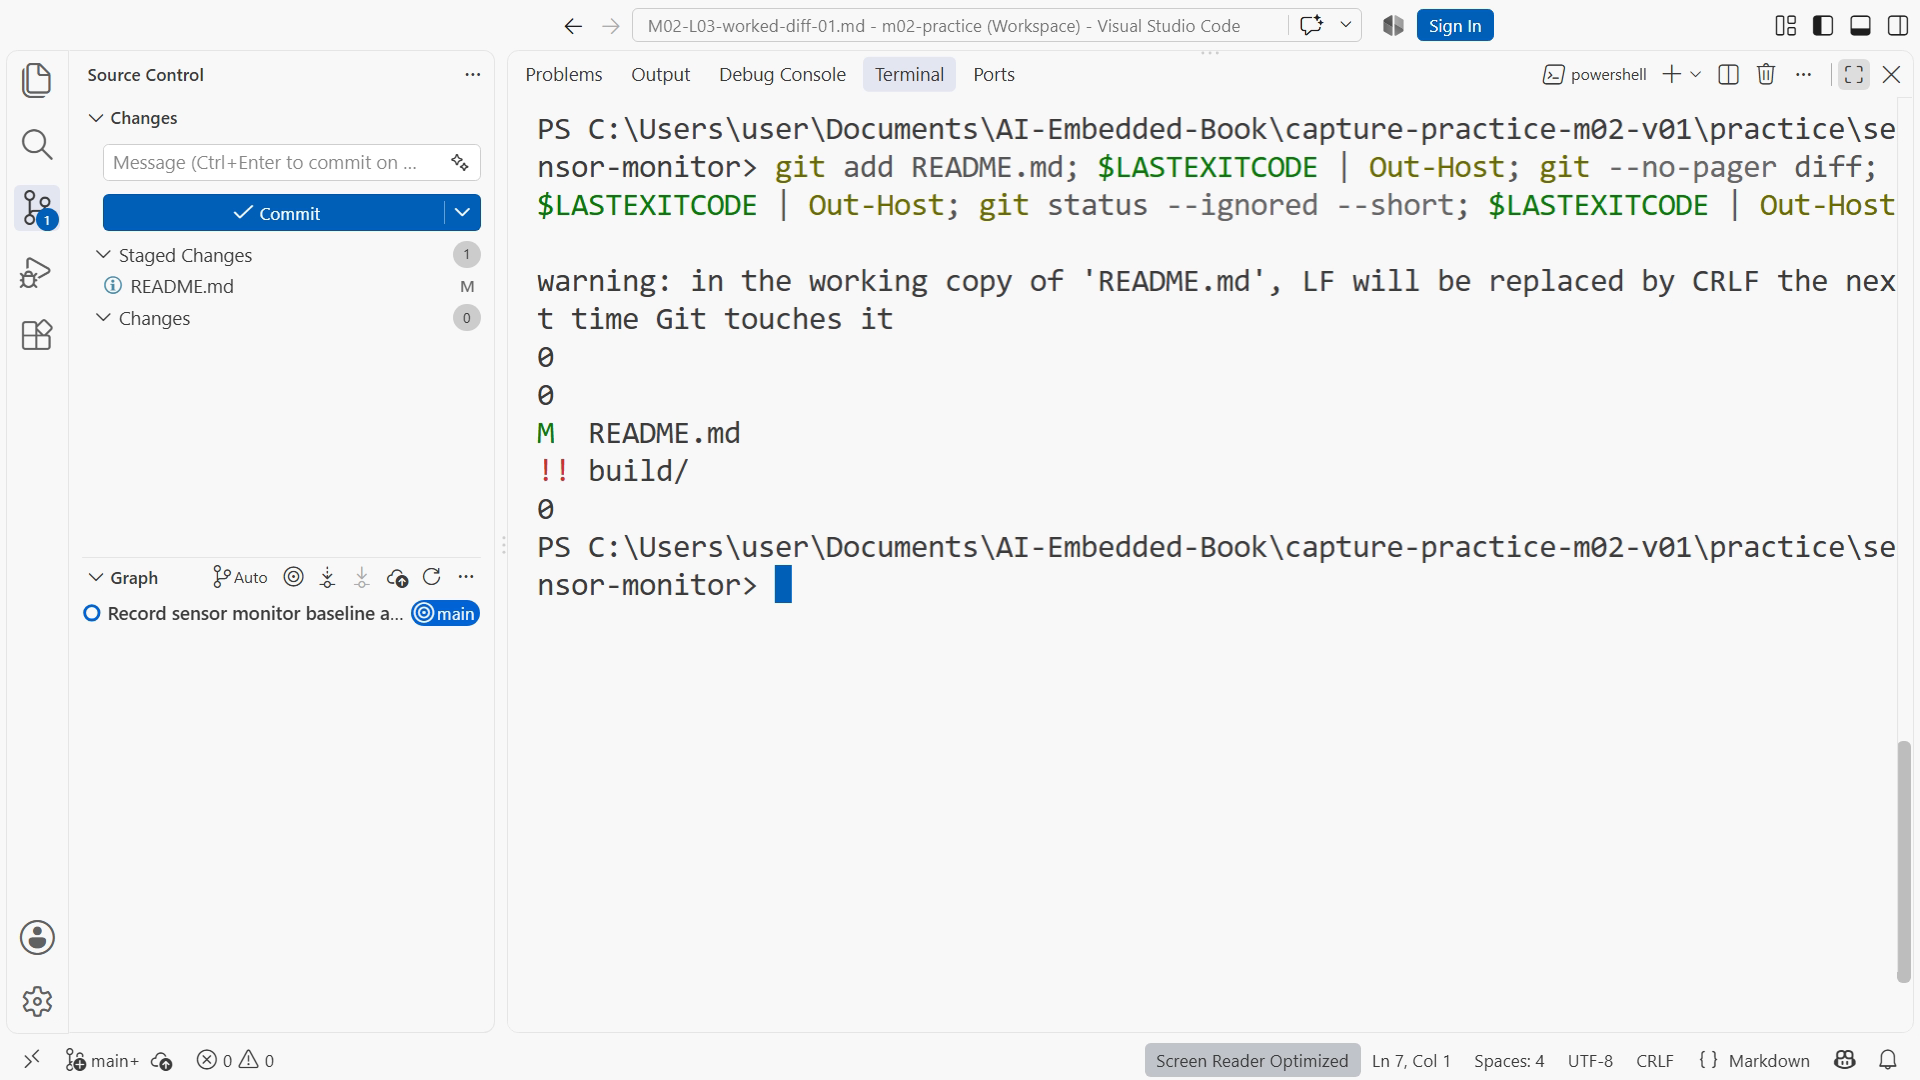
Before staging, the ordinary diff should show your edit; the cached diff should be empty if nothing is staged. Stage only README.md, then run both commands again. The selected edit should move to the cached comparison. This is the moment to explain the change aloud: which label changed, why the input origin is clearer, and which behavior was preserved.
The selected path is the CP01 README.md; do not use the expected two-line fragment as proof that your whole working tree is correct. Inspect the actual changed lines, run the relevant project check, and compare the result with the task brief. Figures SS05-03 and SS05-04 belong to this real diff and staged selection.
7. Lab LAB05: save a meaningful change
Starting from your baseline commit, perform the supplied reporting-label edit independently. Write a one-sentence acceptance statement before editing. Use the editor to make and save the change, inspect the ordinary diff, and run the relevant check. Stage the exact file and inspect the cached diff. Then commit with a message explaining the reporting purpose.
# Context: PowerShell in the practice repository; inspect before committing.
git status
git diff --cached
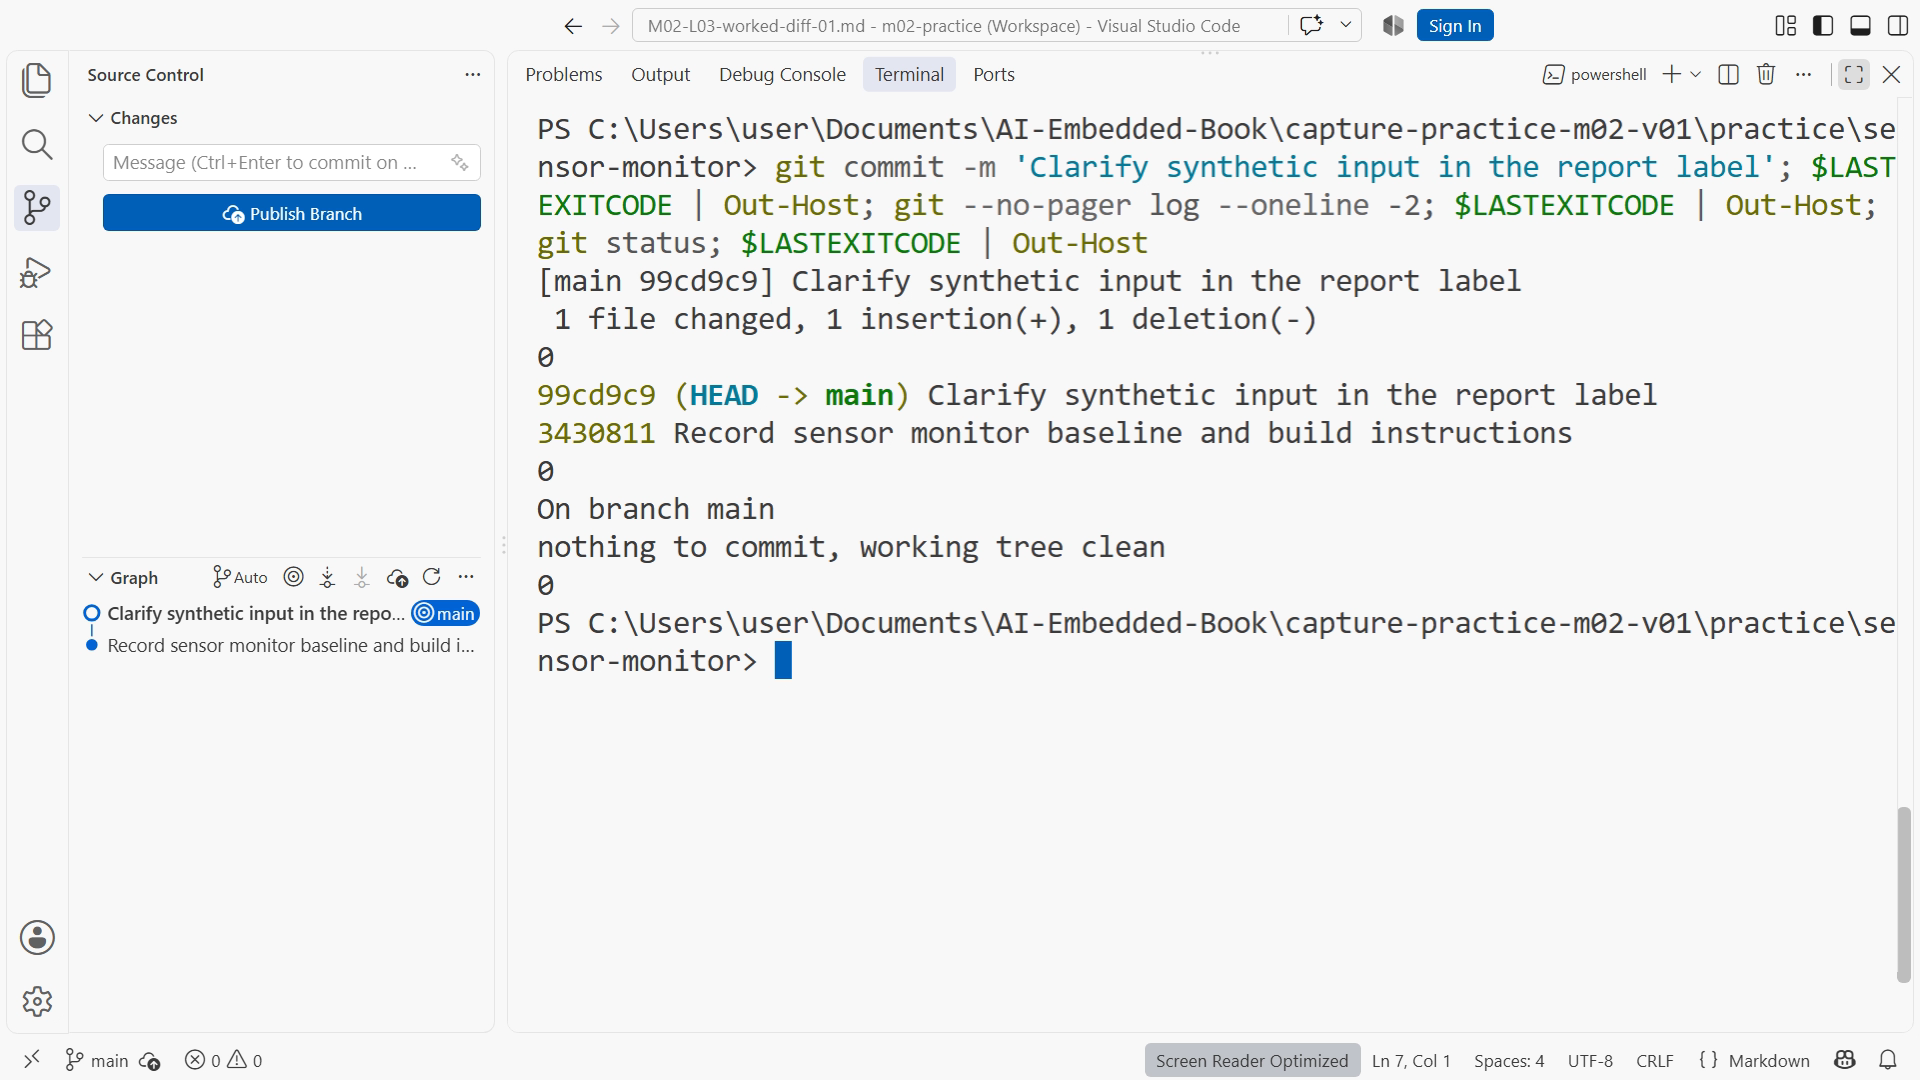
git commit -m 'Clarify synthetic input in the report label'
git log --oneline -2
git status
Your deliverable is two explanatory commits plus a short note identifying the baseline and label change. The expected observation is a history whose second entry contains only the intended change and any deliberately associated documentation. Your IDs and timestamps will differ from the book. Figure SS05-05 shows the teaching history and message order.
As an additional staging check, edit a harmless sentence in the README, stage it, then edit that sentence again. Inspect both diff views without committing. Explain which version would enter a commit now. Restore your chosen final sentence in the editor and restage only if you intend to keep it. This shows that “staged file” does not mean every future edit to that file is automatically selected.
8. Failure and recovery: staged build output
Practice this only after the baseline commit exists. Create a harmless text file such as build-note.tmp in the practice root, deliberately stage it, and inspect the staged diff. It represents accidental generated output. Unstage this specific path while preserving the file:
# Context: PowerShell in the disposable practice repository, after a baseline commit.
git restore --staged -- build-note.tmp
git status
With --staged, this operation updates the staging area; it does not discard the working file. Add an appropriate exact ignore entry for the teaching temporary file, or use the project's existing generated-output directory in actual work. Then inspect .gitignore and stage its intended change. Avoid broad patterns that accidentally hide real fixtures or source. git restore reference
If generated output was already committed, an ignore entry alone will not untrack it. That is a different state requiring a deliberate tracked-file cleanup, outside this simple staging exercise. Identify the state first. Do not respond by deleting the project or using a destructive reset. The recovery here is complete when the unwanted path is absent from the staged snapshot and the useful work remains present.
Completion checklist
- I initialized the intended source-only folder and recorded local identity.
- I can distinguish working, staged, and committed contents.
- I inspected ordinary and cached diffs before each meaningful commit.
- I have two explanatory commits and relevant verification evidence.
- I recovered from staging harmless output without deleting useful files.
Review questions with answers
1. Does saving in VS Code create a commit? No. Saving updates the working file. Staging selects contents, and committing records the selected snapshot. These actions are separate even when an interface places their controls close together.
2. Why can one file appear staged and unstaged? You may have edited it after staging. The index contains one version and the working tree another. Compare both diffs to decide which content belongs in the next commit.
3. Does a clean status prove the tests pass? No. It describes repository state. A test result must come from a named command and source version. Keeping both observations gives a much more useful checkpoint.
Transfer exercise
Choose a recent change in a real project. Describe a commit boundary that would make its purpose easy to review and undo. Identify one file that belongs with the change and one generated or unrelated artifact that does not. Use that boundary during your next small task.