8. Markdown as an Engineering Notebook
What you will be able to do
You will turn working notes into a README that another person can follow, preview the result, repair a broken link, and distinguish a command from its expected output. CP01 and the Git habits from Chapters 5–7 are prerequisites. Use CP02 for this chapter’s linked README exercise because it supplies the hardware reference. The deliverable is a readable README plus a short record of the setup and link checks you actually performed. No board is required.
CP01–CP04 are deliberately small baselines: the host command prints one fixed JSON reading with synthetic: true and temperature 25.00. It does not parse fixtures or implement the later policy. The full project architecture is the destination; this chapter documents the current baseline honestly.
Plain text with a second view
A useful notebook lets you return to a project without reconstructing its history from memory. Markdown is a practical choice because its source is ordinary text: an editor can open it, Git can show its changes, and a person can read it before any publishing system is available. A renderer interprets some punctuation as structure. You therefore work with two views of one document: the source you edit and the formatted page your reader sees.
That distinction matters in an engineering project. A shell command may look correct in the editor but become an awkward paragraph in the preview. A heading may look decorative while failing to create a useful document outline. A link may have an informative label while pointing to a file that moved last week. Reviewing only the source misses these faults. Reviewing only the preview can hide a command that copied incorrectly or a path that depends on your computer.
Keep the notebook close to the code. In the learner project, README.md lives at the Sensor Monitor root, alongside firmware, host, scripts, and docs. It answers the first questions: what the project does, what is needed, how to run a check, and where to read further. It does not need every design decision or every log. Those records can have their own files once they contain useful information.
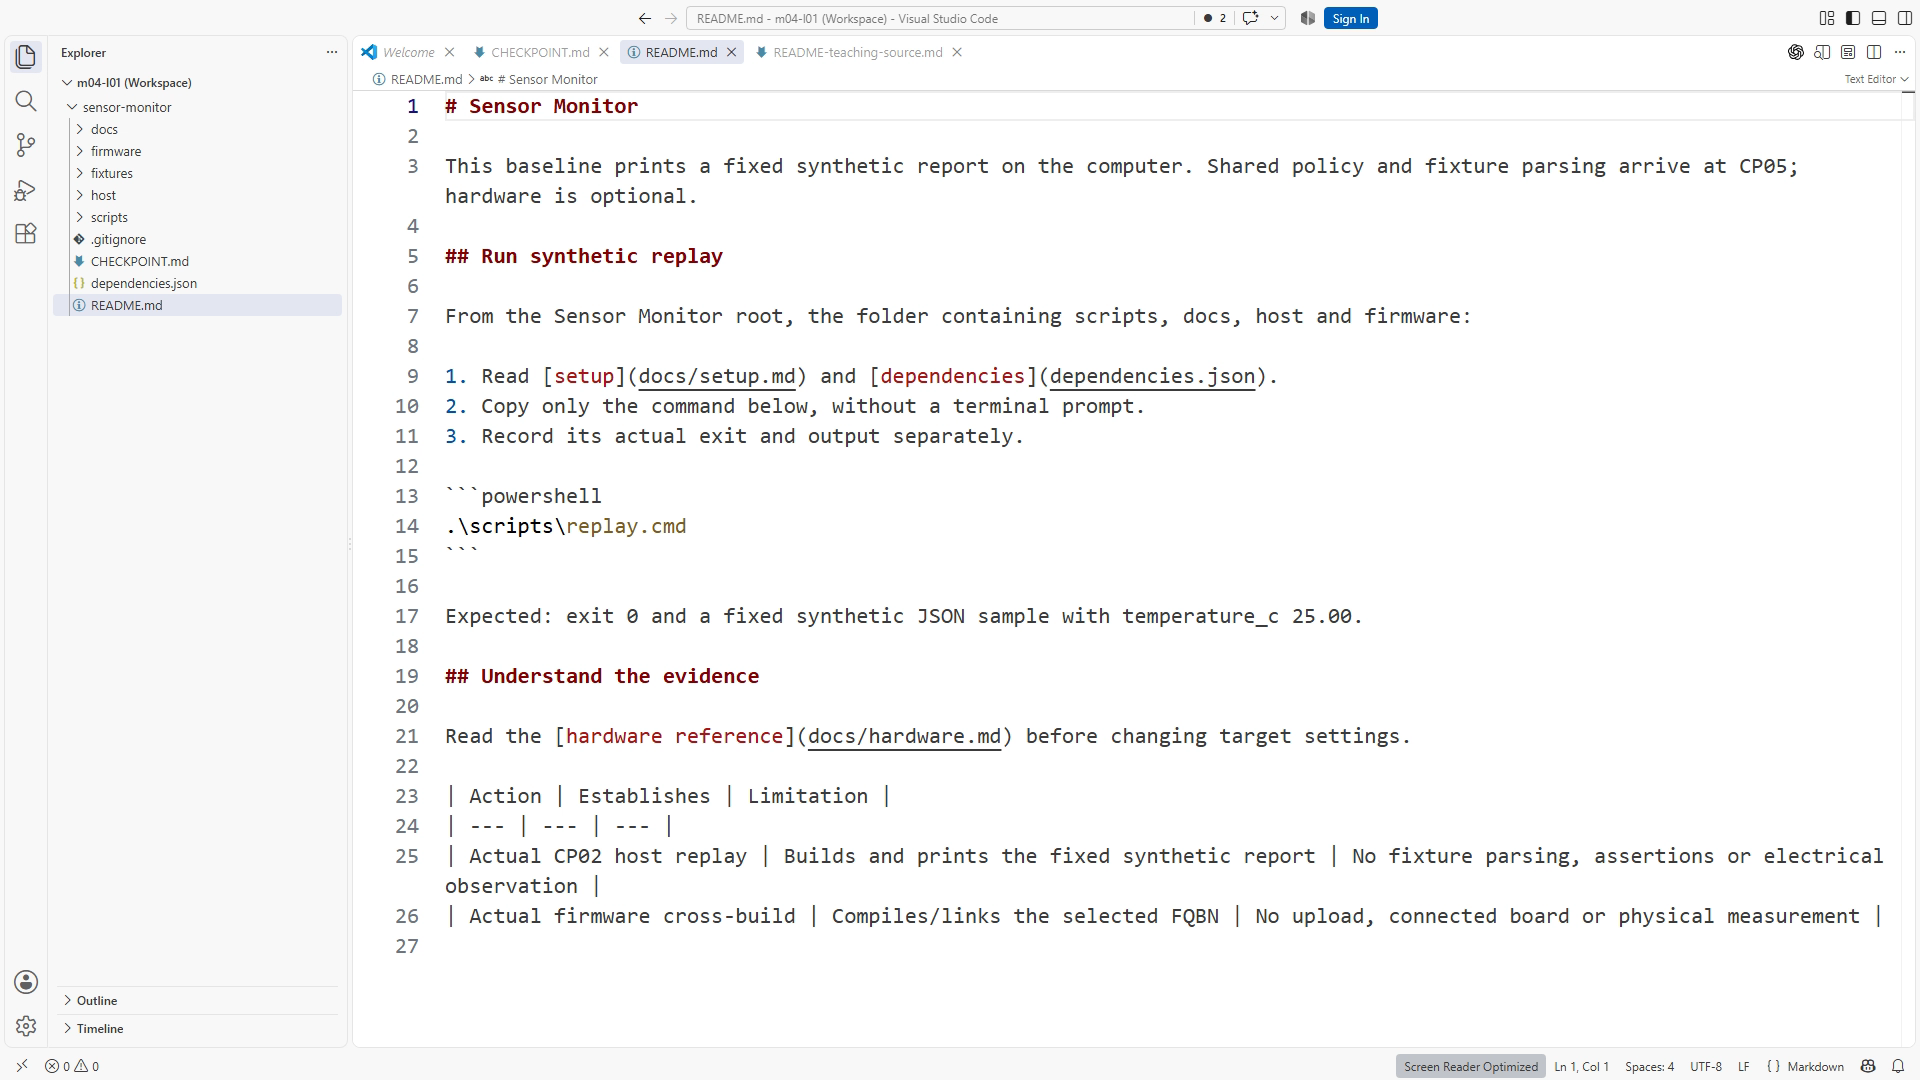
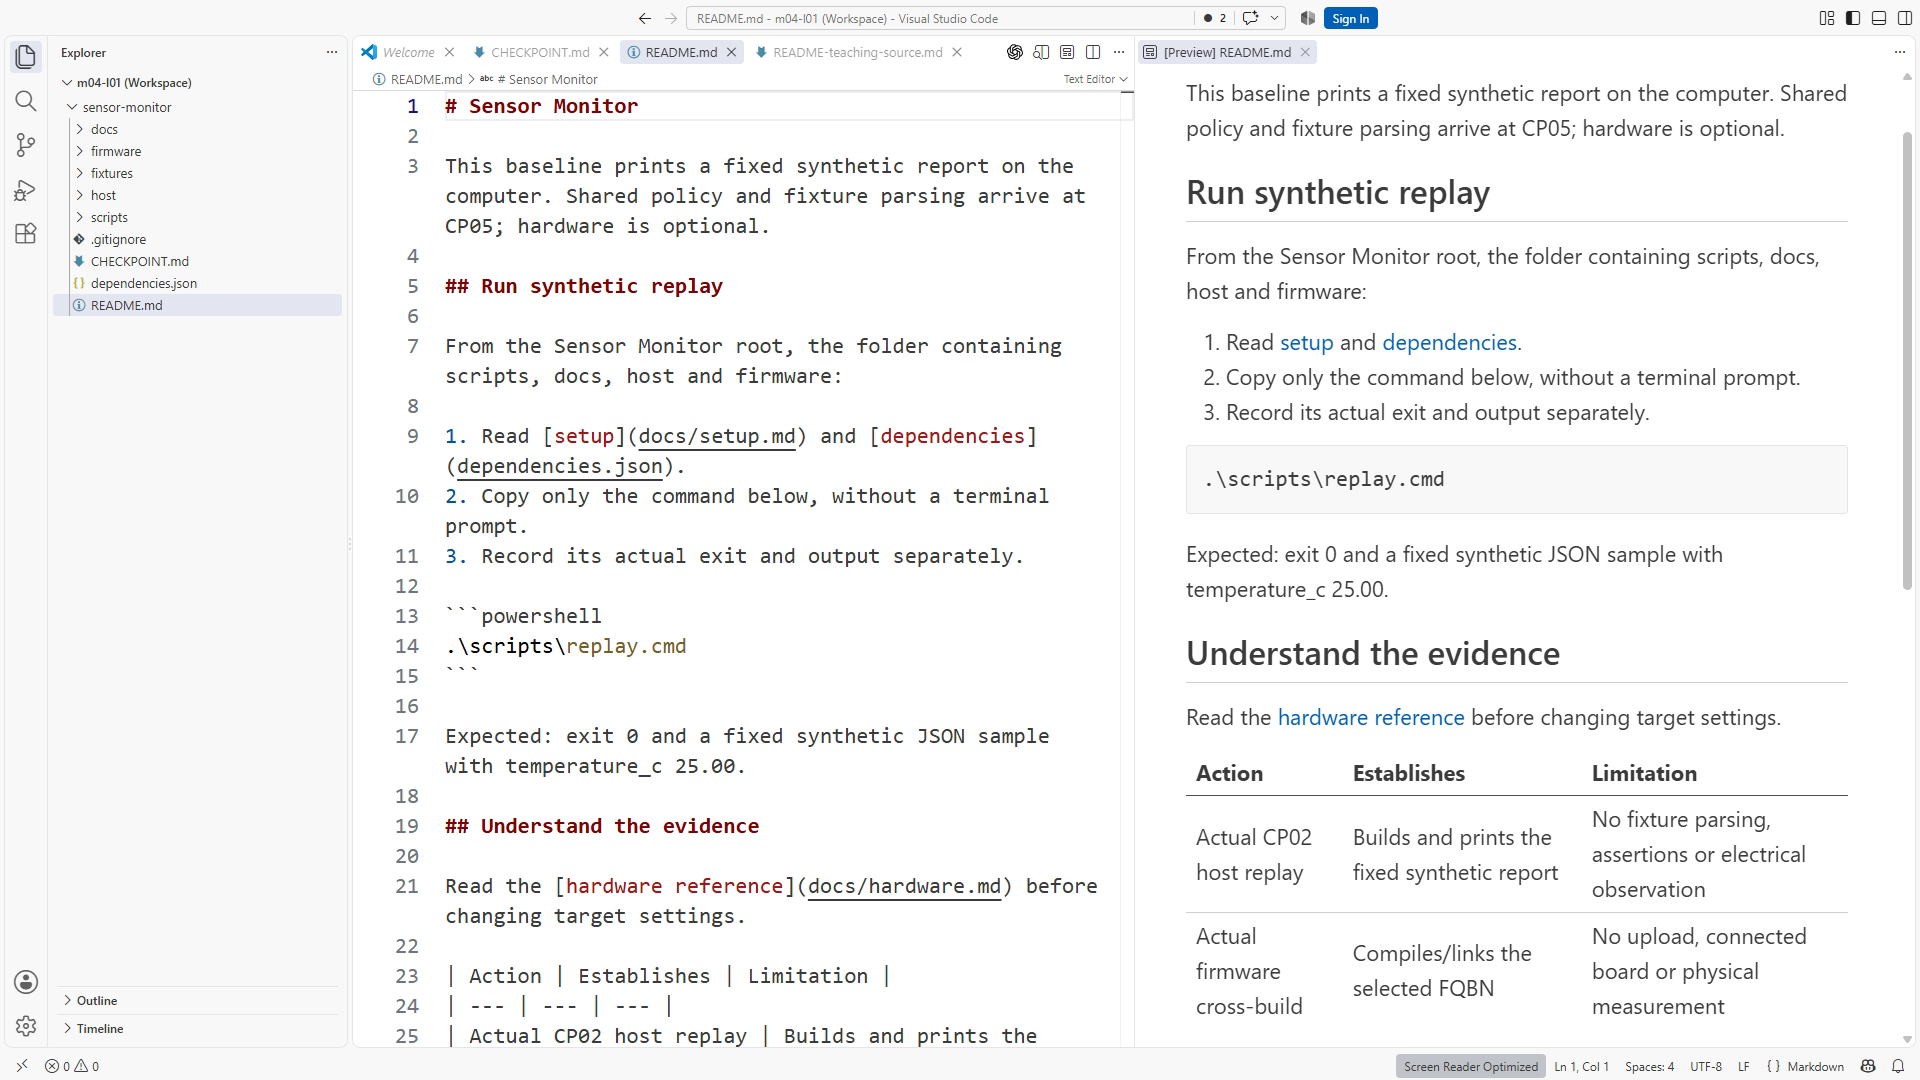
Use the editor's Markdown preview to compare source and rendering. In VS Code, open the Command Palette and search for Markdown: Open Preview to the Side. The exact placement of controls can change between versions; the command name and document result are the useful landmarks. The official VS Code Markdown guide describes the editor's Markdown support. Figure SS08-01 identifies the source structures; SS08-02 pairs them with the rendered view.
Give the page a navigable structure
Use one top-level heading for the document title, then second-level headings for its major sections. Add third-level headings only when a section contains real subsections. A heading names the material that follows it. “Run synthetic replay” helps a returning reader more than “More information.” Consistent levels also help navigation and accessibility in the exported book and course.
# Sensor Monitor

A small firmware and host-test project for learning a verified workflow.

## Requirements

## Run synthetic host replay

## Build firmware

## Troubleshooting
This is a structure to populate, not a finished README. Delete unused headings rather than collecting empty categories. A short complete document is easier to trust than a long list of promises. As the project grows, add a section when a reader has a question that cannot be answered in the existing structure.
Use bullets for parallel facts and numbered steps when order matters. “Install the tools, open the project root, run the replay command” is a sequence. “Host tests, synthetic replay, optional board deployment” names alternatives with different evidence. Do not hide ordered work inside a long paragraph, and do not turn every sentence into a bullet. The format should expose the relationships between the ideas.
Leave a blank line around headings, lists, tables, and code blocks. This makes the source easier to inspect and reduces surprises across renderers. Use ordinary paragraphs for explanation. Bold text can draw attention to a required starting directory or an evidence limitation, but a page where everything is emphasized has no hierarchy.
Show commands as commands
Inline backticks identify a short filename, state name, or code expression: README.md, FAULT, or temperature >= threshold. For a command that a learner should copy, use a fenced block. The opening fence can include a language label such as powershell, cpp, or text. A language label helps rendering; it does not execute or validate the content.
From the Sensor Monitor project root, the supplied Windows replay entry point is:
.\scripts\replay.cmd
Explain the environment before the block. This command runs the supplied, reviewable Windows wrapper from PowerShell. Read the wrapper and follow the setup route documented for your machine. The wrapper configures its process environment; the lesson does not require changing PowerShell execution policy. If the command fails, record the message and inspect the documented dependency and working-directory checks.
The command's working directory is part of the instruction. A relative path beginning .\scripts is meaningful only when the current directory contains that folder. Do not include a prompt such as PS C:\...> in a copyable block. It is useful visual context in a screenshot, but it is not part of the command. Keep output in a separate text block or describe the acceptance condition in prose.
For this chapter, the acceptance condition is that the replay command completes successfully and its output matches the documented fixed synthetic report. Your exact output belongs in your own evidence record. Do not paste a fabricated “all tests passed” line into the README as though it came from your run. A clearly labeled expected result is helpful; a pretend observation is harmful. This difference becomes central in Chapter 9.
A firmware cross-build has a different purpose:
.\scripts\build-firmware.cmd
The wrapper preserves the selected target configuration. A successful build demonstrates that the source compiles and links with the recorded toolchain and options. It does not show that a board was connected or that a physical sensor produced readings. Put that limitation beside the command, where the reader is about to interpret its result.
Use links as part of the procedure
A Markdown link has descriptive text and a destination. At the repository root, this example points into the project documentation:
Read the [hardware reference](docs/hardware.md) before changing board settings.
The words explain why a reader would follow the link. “Click here” does not. Relative links keep the project portable: the same relationship can work in another checkout without the author's absolute computer path. The destination is interpreted relative to the file containing the link, so a link in docs/handoff.md has a different starting point from one in README.md.
Suppose the handoff needs to link back to the root README. Its relative destination is ../README.md: go up one directory, then select the file. Suppose two documents both live under docs. Their link can use the other document's filename directly. Before creating a path with several .. segments, inspect the tree and make sure the document organization itself is still understandable.
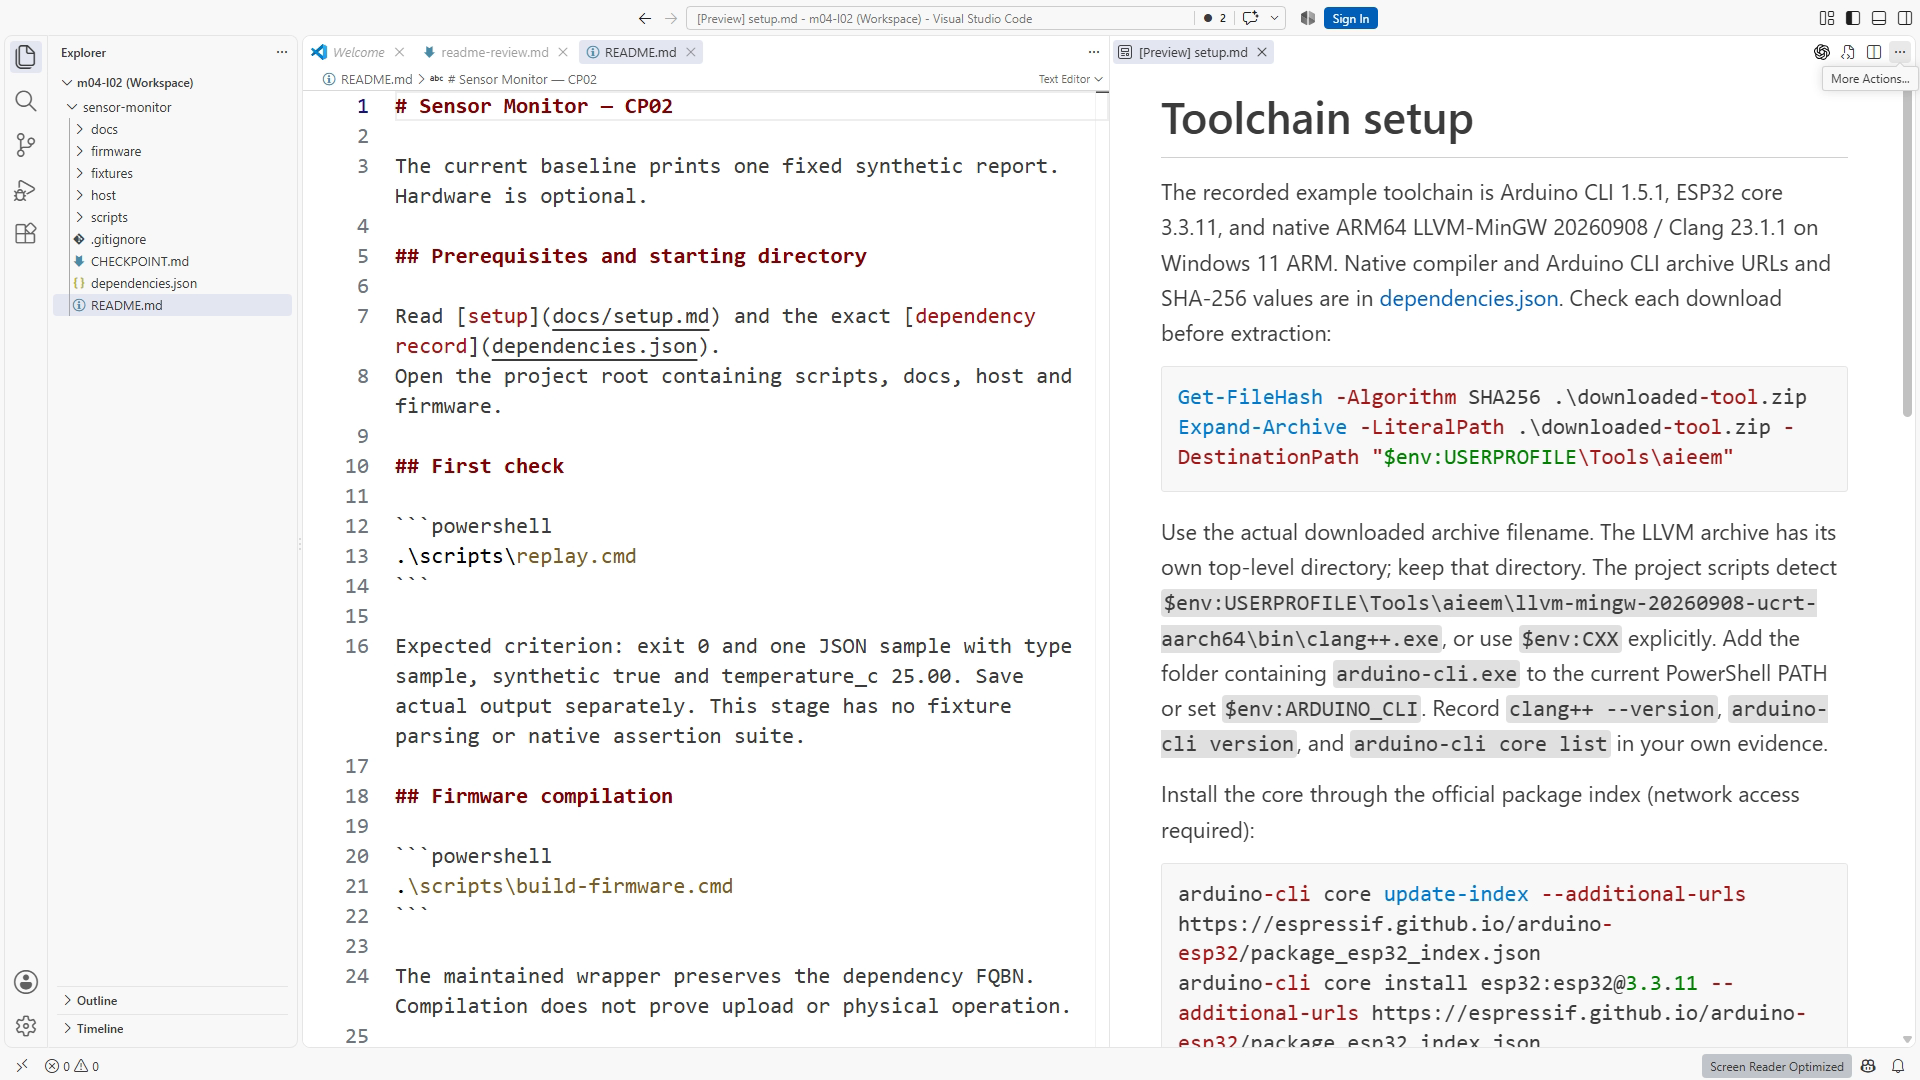
Test links by following them in the rendered view, as illustrated by SS08-03. Confirm that the opened document is the intended one, not merely a file with a similar name. Check capitalization consistently even when the current operating system tolerates a mismatch. A project that works on one case-insensitive filesystem can reveal errors on another system or in a publishing build.
Links into headings can be convenient, but heading identifiers depend on the renderer. If the target heading changes, revisit incoming links. For a beginner-facing setup path, linking to a small document is often more durable than relying on a deeply nested heading anchor. External links should name the source and land on the relevant page rather than on a generic search result.
Images use related syntax with an exclamation mark. Supply alternative text that conveys the relevant information, and keep a caption when provenance or interpretation needs explanation. A screenshot of passing host tests needs a caption naming the test and checkpoint. It should not be labeled “working hardware.” The image helps a reader recognize a state; the selectable command and explanation must still teach the step without requiring them to read small pixels.
Tables and checklists earn their space
A table is useful when each row can be compared using the same columns. For example:
| Action | Establishes | Does not establish |
|---|---|---|
| Host test | Behavior for supplied cases | Electrical behavior |
| Synthetic replay | Shared logic on controlled input | Sensor measurement accuracy |
| Firmware build | Compatibility with selected build inputs | Successful upload or wiring |
The vertical bars separate cells and the hyphen row separates the header. GitHub's table syntax is documented in its table-formatting guide. Keep rows short enough to read on a narrow screen. A complex troubleshooting explanation usually belongs in prose with a descriptive heading, not in a table containing paragraphs inside every cell.
A checklist can record the progress of a procedure. It does not validate its own claims. Checking “build passed” because the command was attempted confuses an action with an outcome. Use separate items when the distinction matters: command completed, exit status inspected, output reviewed, and evidence saved. Avoid a checklist of vague qualities such as “good documentation.” Replace it with something observable, such as “every setup link opens the intended file.”
Do not rely on a checkbox as the sole explanation. A checked item should point to the evidence or be accompanied by a concise note. If the check is a plan for later work, leave it unchecked and label the document as a plan. This is a simple way to avoid converting hope into history during a hurried update.
Worked example: turn terse notes into a README
Consider these deliberately incomplete notes:
sensor demo. clang installed. run tests. board build later.
They may remind the author what happened yesterday, but they do not tell another person what to do. Begin by identifying missing meaning. “Sensor demo” lacks an outcome. “Clang installed” lacks a version reference and installation route. “Run tests” lacks a working directory and command. “Later” names neither a requirement nor a current result.
Rewrite the current purpose first: “This checkpoint prints a fixed synthetic report on the host and provides a minimal sketch for cross-compilation.” State that no physical board is needed. Shared policy and fixture-driven replay are later milestones, beginning at CP05. This gives readers an accurate model before asking them to install anything.
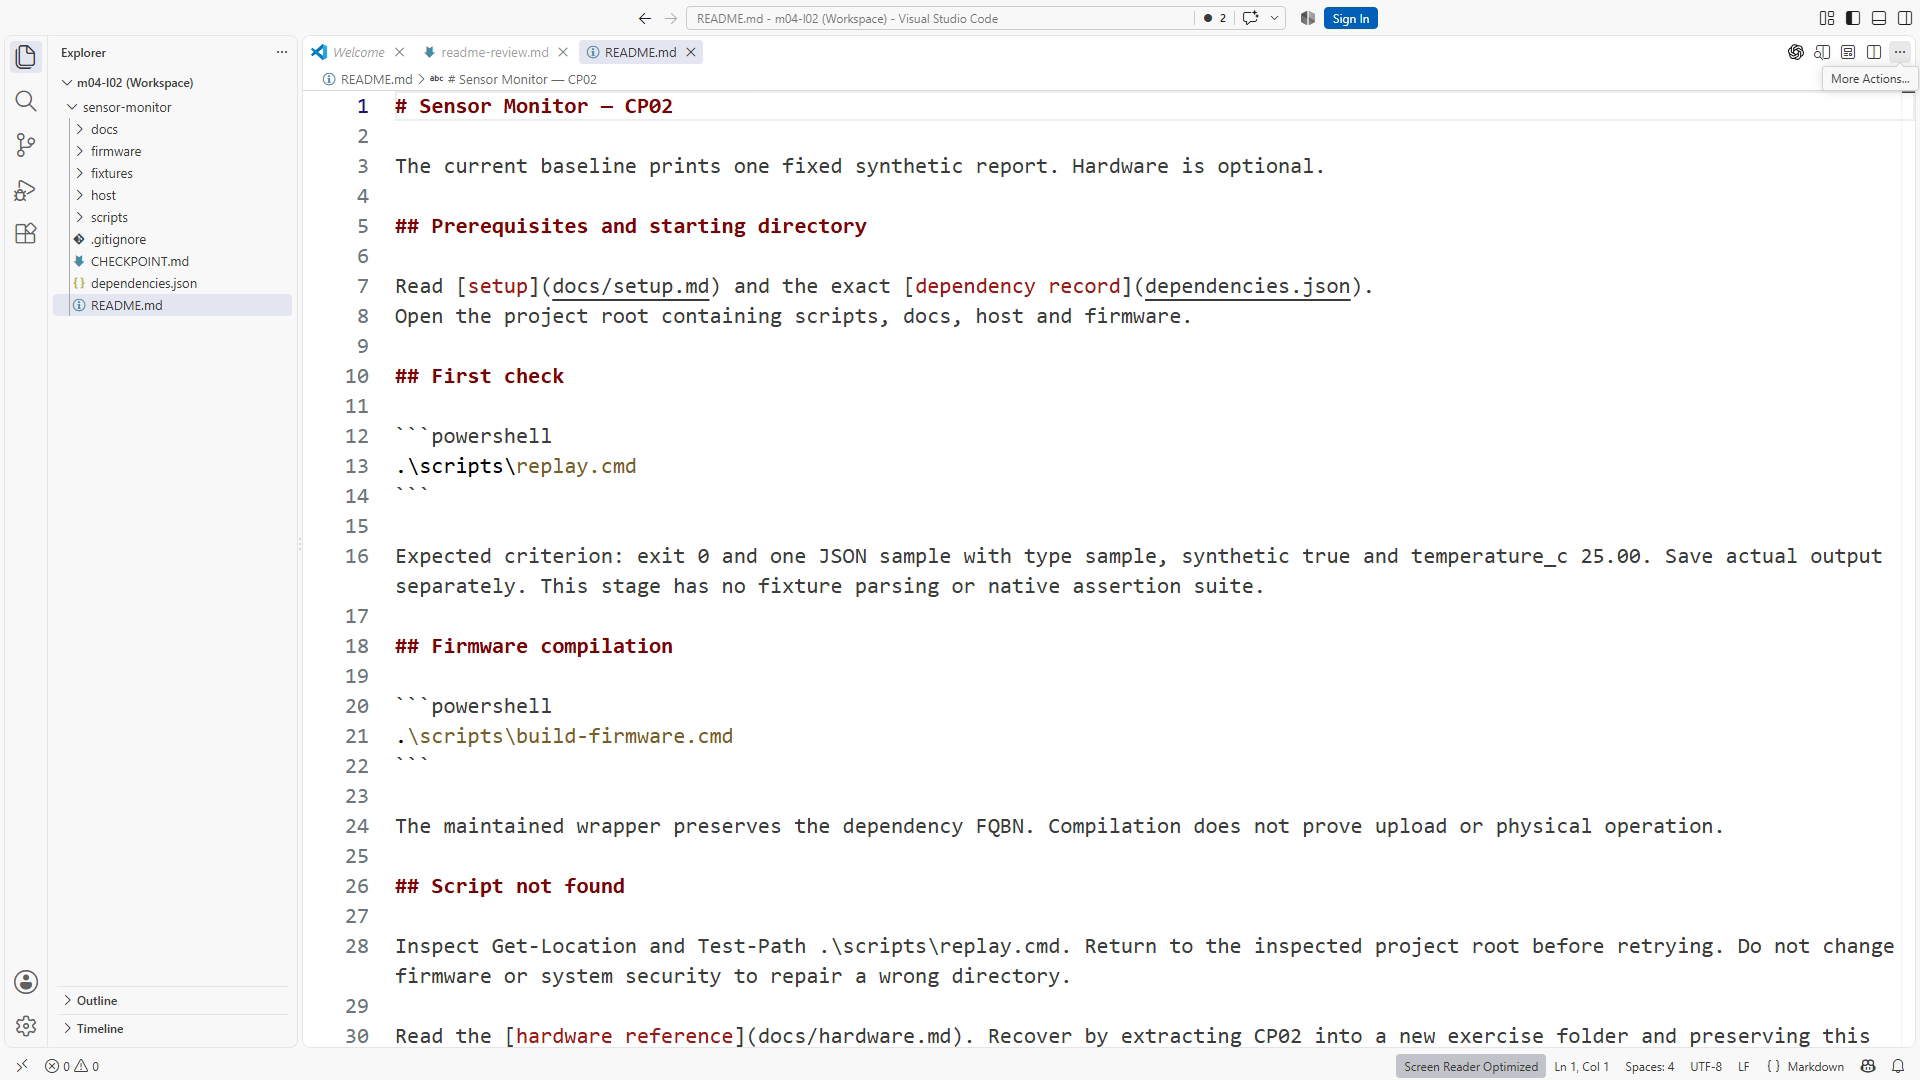
Next, refer to the release's tool setup and dependency record, rather than copying an incidental machine path. Add the replay command in a labeled block and describe success by the process result and documented fixed synthetic output. Host assertion tests are introduced at CP07; CP01–CP04 use replay and build checks. Link to the hardware reference for the exact cross-build target. Add a short troubleshooting entry for running from the wrong folder. SS08-04 shows the sections that make this path complete.
Finally, follow your instructions from top to bottom. Do not fill gaps silently from memory. If you have to locate an unmentioned compiler, change directory, or open a different reference, the README needs that information. A second learner can provide valuable feedback, but you can already find many problems by treating yourself as a reader with only the written steps available.
Ask an agent to review the document with a bounded request: “Identify missing prerequisites, ambiguous working directories, and links that do not resolve in this checkout. Propose edits only to the README.” Its review is a useful second perspective. You still inspect the rendered result and the actual commands. Fluent documentation can be wrong just as fluent code can be wrong.
LAB08: add a recoverable troubleshooting path
Allow about 25–40 minutes. Extract CP02 into a new lab08 exercise folder or use your existing preserved copy. Do not overwrite earlier work. Open the Sensor Monitor root and note the starting Git status if it is a repository.
- Read the README from the perspective of a person returning after a month. Mark one unclear prerequisite or working-directory assumption.
- Add a Troubleshooting section with a “Script not found” entry. Explain how to confirm the project root and locate
scripts/replay.cmdbefore retrying. - Include a relative link to
docs/hardware.md, plus a sentence explaining when it is needed. Keep host replay and firmware compilation as separate actions. - Open the Markdown preview. Follow the relative link, return to the README, and copy the replay command from the preview into the intended terminal.
- Run the documented check when the required tools are available. Save the actual outcome, checkpoint, command, and any remaining setup problem in your exercise notes.
- Review the diff. Confirm that your change improves navigation or reproduction and does not introduce machine-specific paths or unrelated source edits.
Submit the edited README and the short check record. If tool setup is incomplete, your formatting and link checks can still be complete, but the build-path check remains open. Record the exact missing dependency; do not award yourself a passing execution result merely because the command is present.
Failure and recovery: the plausible broken link
Seed the fault only in your exercise copy by changing docs/hardware.md to doc/hardware.md. The label still looks sensible. The rendered page may still look polished. Following it reveals the defect. Compare the destination with the actual directory name, restore the correct path, and follow it again. Preserve both the cause and the correction in your notes.
A second fault is a command written as an ordinary sentence. A reader may copy extra punctuation or miss a line break. Move the command into a fenced powershell block, keep the explanation outside it, and test the copy operation. Formatting is functional here: it helps preserve the exact input needed for a reproducible procedure.
Completion check and review answers
You are finished when the README explains purpose, prerequisites, working directory, commands, expected outcomes, evidence limits, and a useful recovery path; its preview is readable; its links resolve; and the recorded execution outcome is honest.
Why inspect both source and preview? The source exposes exact syntax and paths; the preview exposes what the reader will see and copy. Neither view replaces the other.
Does a language label run a code block? No. It helps rendering and tells the reader what kind of text it contains. Execution is a separate action with a separate result.
Why prefer relative project links? They express relationships within a checkout instead of depending on an author's machine location. They still need testing from the document that contains them.
Can a screenshot replace a command? No. It can illustrate the result, but the instruction should remain searchable, selectable, and understandable without small image text.
What does a successful firmware build prove? It supports a software build claim for the recorded inputs. Physical operation, wiring, and sensor accuracy require different evidence.
Transfer to your own work
Choose one small project you already understand. Write a six-section README using purpose, prerequisites, first check, expected result, references, and troubleshooting. Ask someone else to follow it if available, or repeat it from a fresh exercise folder. Record every assumption you had to supply from memory. Those assumptions are the most useful material for the next revision.
Optional deeper practice: review the README's Git diff after a week of changes. Can you distinguish changed behavior from improved wording? If an important command changed, connect that edit to the release or dependency change that justified it. Your notebook is now part of the engineering workflow, not an accessory added at the end.
Sources and figures
Primary references: VS Code Markdown support and GitHub tables, accessed September 12, 2026. Commands and file names refer to the accompanying Sensor Monitor release. Figure IDs: SS08-01 source, SS08-02 preview, SS08-03 link navigation, SS08-04 finished README. Screenshots document actual demonstrations only; the written examples above are instructional text, not transcripts of an agent run.